Replication in AEM
Introduction
In AEM, sometimes we come across the scenario of replicating the content with a specific replication agent. For example, if we want to replicate the content from one instance to another AEM instance, we can’t achieve this with the default replication agent. To achieve this, we have to create the replication agent and replicate it with the help of the Replication API and Replication Options.
What is Replication in AEM?
-
In AEM, replication is the process of taking the content you’ve created on the author instance (your workspace where you manage pages, assets, and configurations) and making it available to end users on the publish instance (the live site). It’s like hitting “Send” on an email—you’re taking something you’ve worked on and pushing it out for others to see.
-
When authors finish creating or editing content, replication moves it from the author environment to the publish environment. Without replication, the end user cannot see the updated content. It’s like designing a poster but never putting it up—your work exists, but no one can see it.
-
We can have one or more than one published AEM instances

Why is Replication Important for Content Delivery?
-
Replication plays a key role in AEM for content delivery. It ensures your website reflects the latest changes and remains relevant to your audience. Without it, your site would feel outdated and unresponsive.
-
Keeping Your Site Fresh
- Imagine you’re running a sale, and your homepage needs a new banner to announce it. Replication is what takes that banner from your internal workspace and puts it live on your website for all to see. Without this step, your promotion might never reach your audience in time.
-
Safe Environment for Testing
- AEM’s author instance is like a backstage area where you can make changes, collaborate with your team, and test everything without the risk of breaking your live site. Replication is what takes your finished work “onstage,” where your audience can see it.
-
Reaching a Wider Audience
- Replication also works well with multiple publish instances, which is handy if your website needs to handle a lot of traffic or serve users in different locations. It ensures that your content is replicated across all servers efficiently, so your users get a smooth experience no matter where they are.
Replication Agents
-
What Are Replication Agents?
-
Replication agents in AEM are like the messengers of your content. They take the pages, assets, or configurations that you’ve worked on in the author instance and deliver them to the publish instance or another destination. Without them, the updates you make on the author side wouldn’t reach the live site.
-
To put it simply, every time you publish something in AEM, a replication agent steps in to handle the transfer. It wraps up the content, sends it where it needs to go, and ensures everything is in place for your site visitors.
-
-
Types of AEM Replication Agents
-
AEM offers different types of replication agents, each with a specific role to play. Let’s go over the most commonly used ones:
-
Default Replication Agent
- This is your default agent moving content from the author instance to the publish instance. It’s what handles the job when you hit “publish” on a page or update a piece of content.
- For example, if you edit a page, the default replication agent makes sure the changes show up on the live site.
-
Reverse Replication Agent
- This one works the other way around. Instead of sending content to the publish instance, the reverse replication agent pulls data from the live site, like form submissions or comments, and sends it back to the author instance. This way, the content team can review and manage user inputs effectively.
-
Dispatcher Flush Agent
-
The Dispatcher Flush Agent is kind of like hitting the refresh button for your site’s cache. When you make a change like editing text on a page it clears out the old version of that page from the cache. This way, when someone visits the page, they get the updated version right away.
-
So, if you update a blog post or change an image, the flush agent ensures the cached version isn’t shown to visitors. It’s a simple way to make sure users always see the latest content.
-
-
Custom Replication Agents
- In some cases, the default agents just won’t cover all your needs. If you have a project that requires something more specific—like sending data to a third-party service or syncing with a non-AEM system—you can set up custom replication agents. These are flexible and can be configured to suit your project’s particular requirements.
-
How to Set Up Default Replication Agents in AEM
Alright, let’s talk about replication agents in AEM. If you’ve never set one up before, don’t worry it’s not as intimidating as it sounds. These agents are what make it possible to move your content from the author instance (where you create and manage it) to the publish instance (where your audience sees it). It’s like setting up a delivery route for your content. Here’s how you can do it step by step:
- Find the Replication Section
-
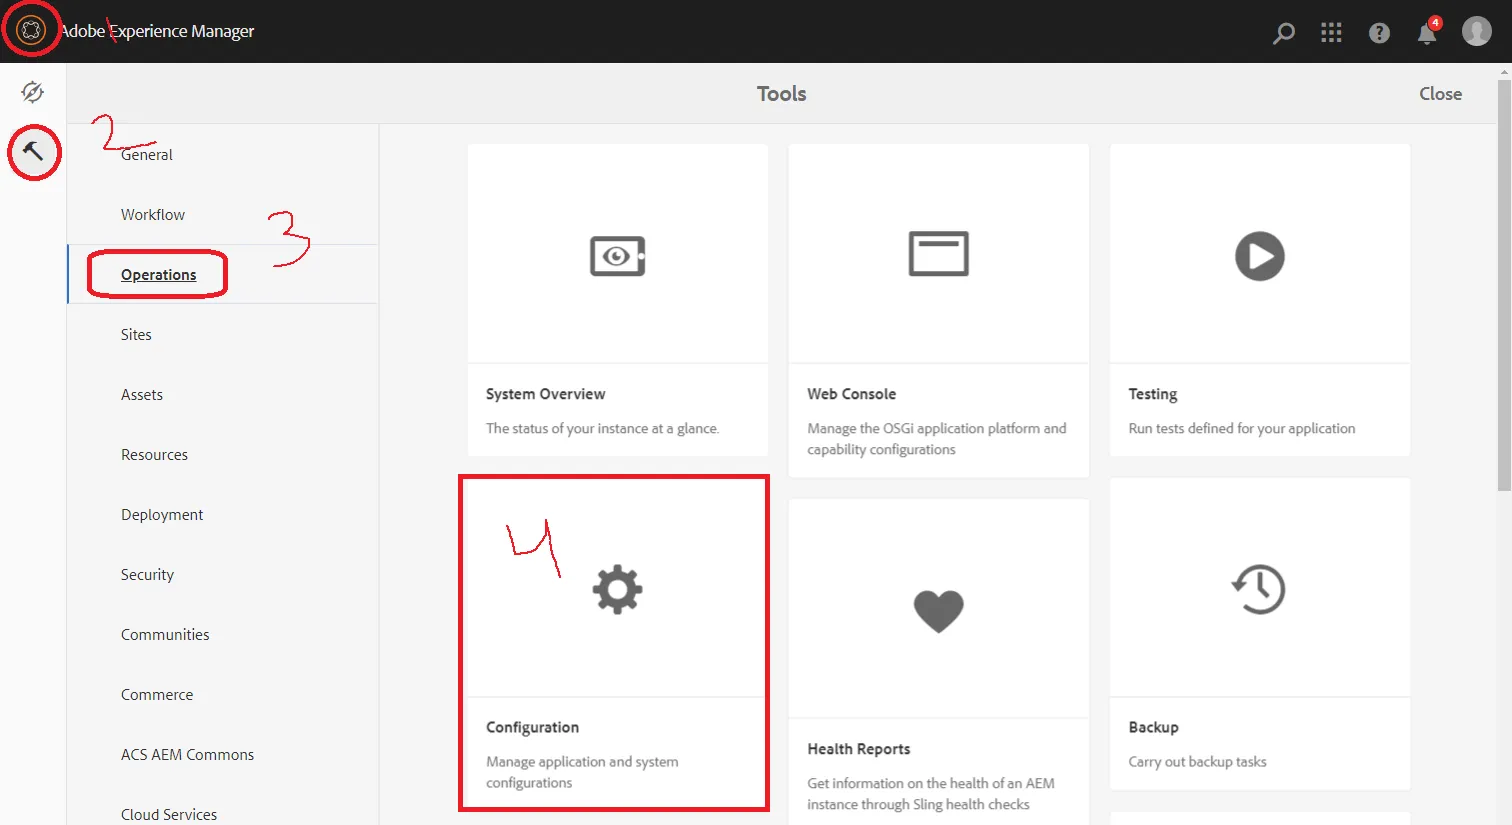
- First, log into your AEM author instance. If you’re working locally, this is probably something like http://localhost:4502. Once you’re in, navigate to Tools → Deployment → Replication. This is where all the replication settings live.
-
Now, you’ll see two main options: Agents on Author and Agents on Publish. We’re working with the Agents on the Author section for now.

- Add a New Agent
- Here’s where the setup starts. You can either create a brand-new agent or tweak one that already exists:
- If you’re creating a new one, look for a button like Add Agent (or something similar, depending on your AEM version).

- If you’re editing an existing agent, just click its name or the edit icon.

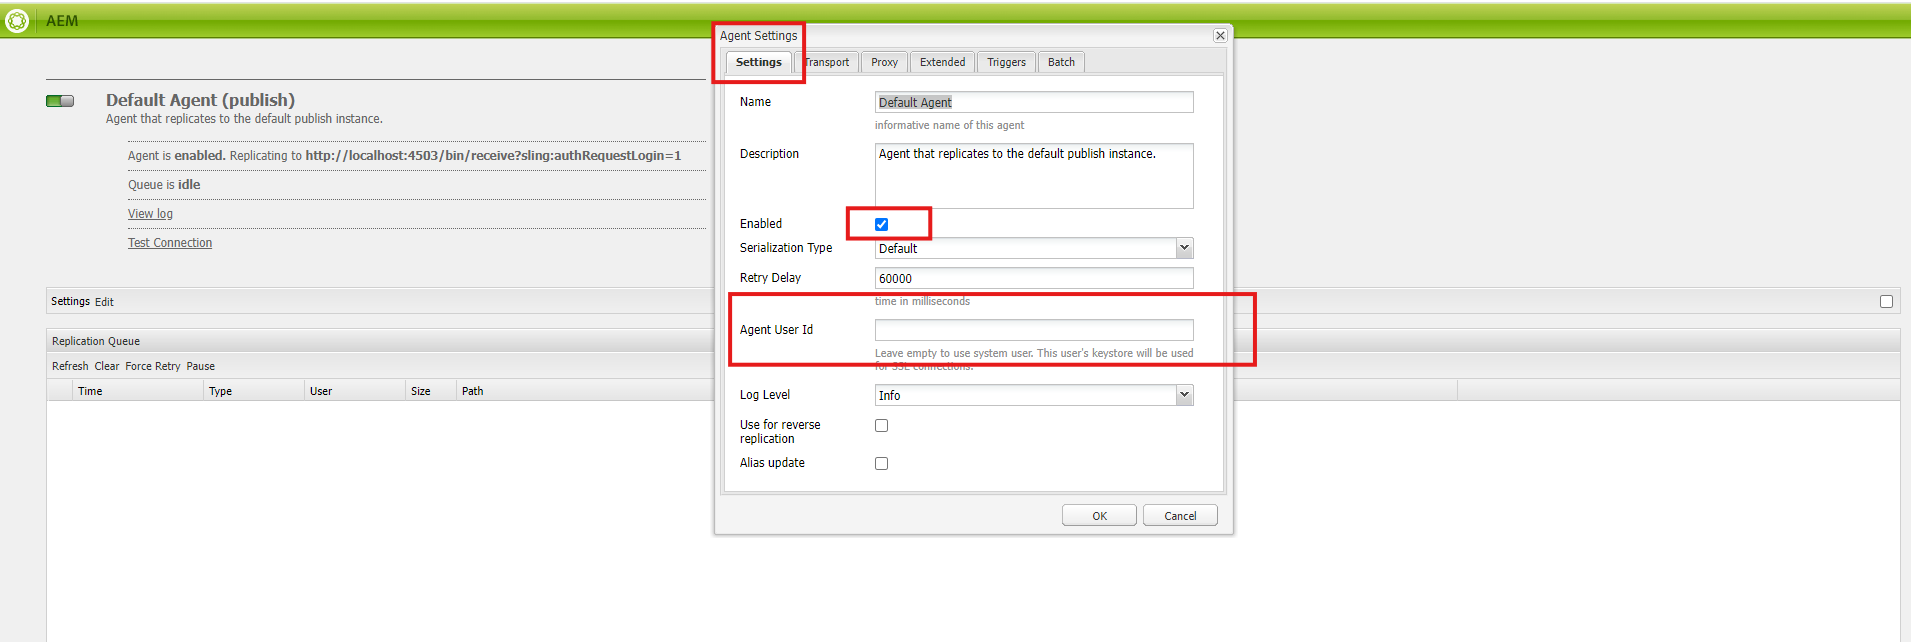
- Fill in the Basics Details
- Once you’re in the agent settings, you’ll need to add some basic info:
- Name: Pick something descriptive, like “Author to Publish Agent.”
- Enabled: Make sure you check this box—this turns the agent “on.”
- Description: Optional, but it’s helpful to note what this agent does, especially if you’re managing a lot of them.
- Agent user ID — Leave this empty
- Configure the Transport Settings
-
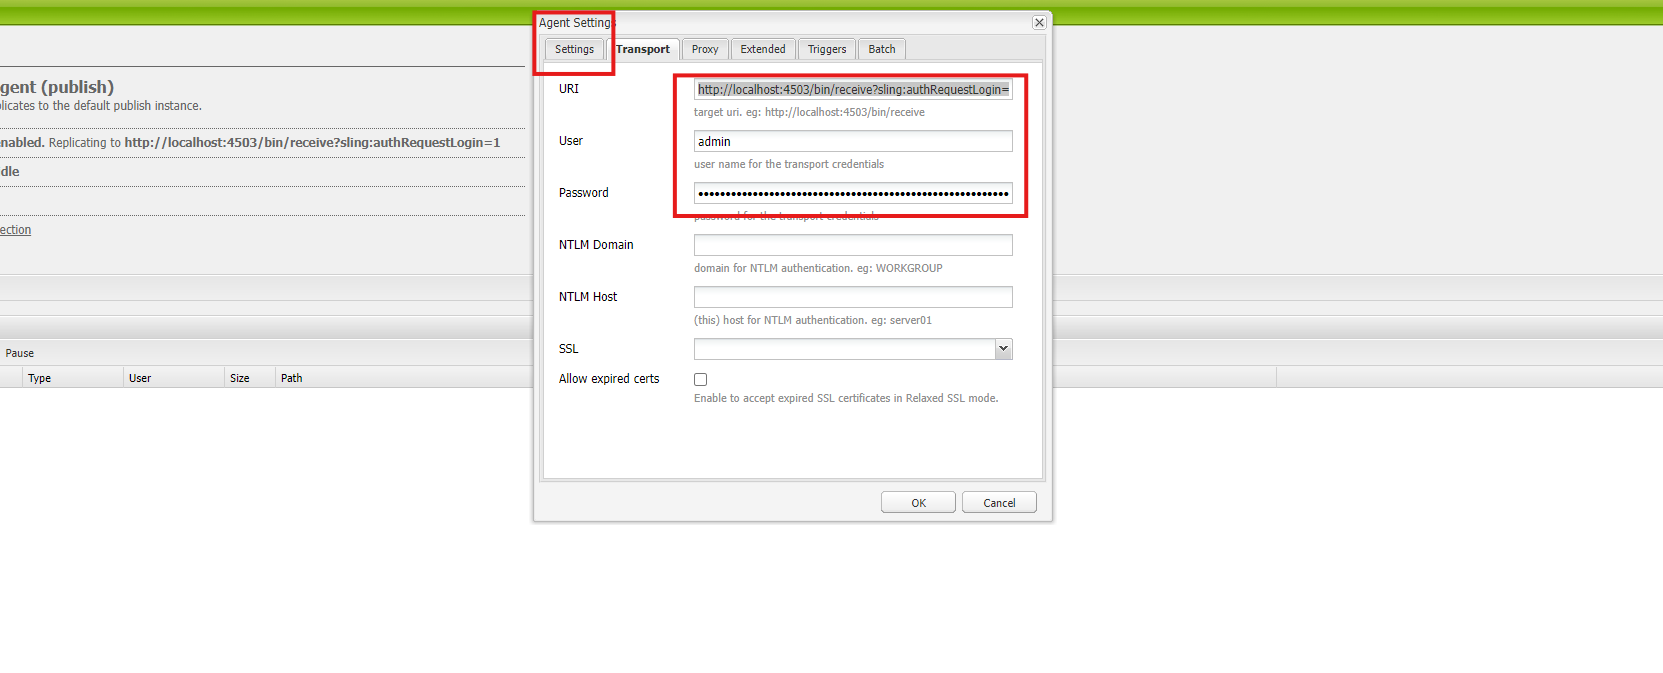
- Now comes the important part—how this agent connects to the publish instance. Go to the Transport tab and fill out these details:
- URI: This is the publish instance’s address. For local setups, it’s usually something like http://localhost:4503/bin/receive.
- User and Password: Use the credentials for the publish instance. If you haven’t changed them, they’re probably admin/admin. (Side note: Change these in production for security!)
- Test the Connection
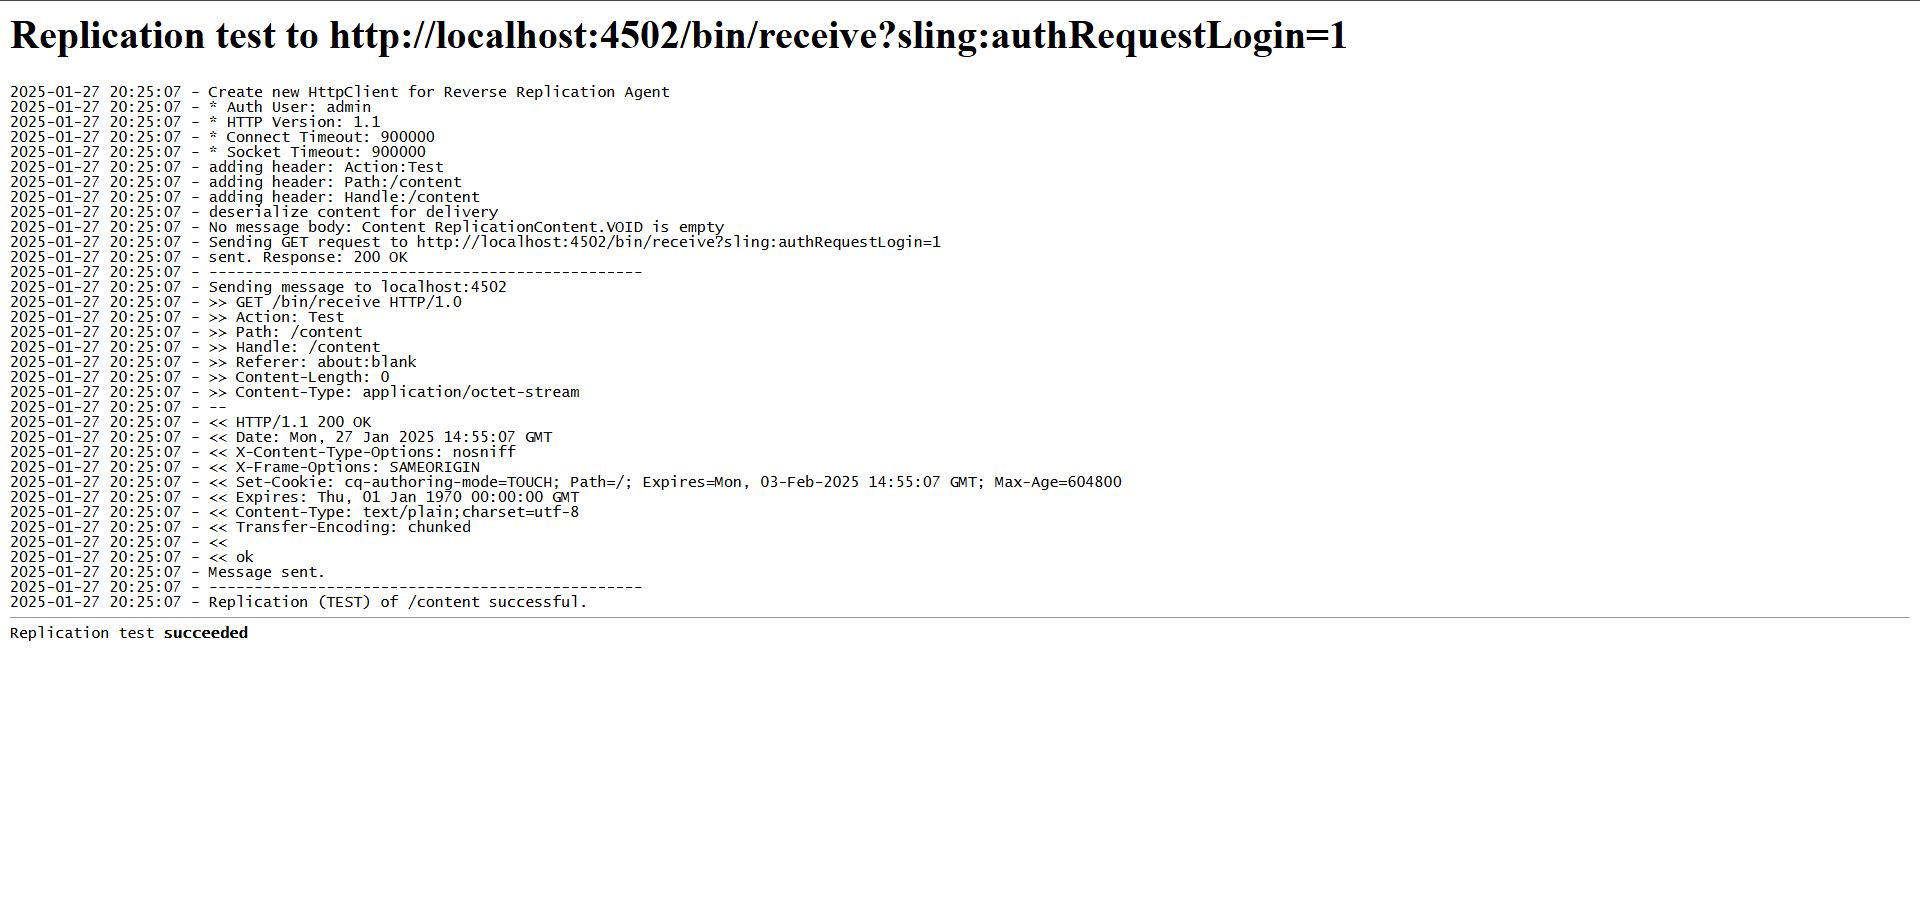
- Before wrapping up, always test the connection. There should be a Test Connection button. Hit it, and if everything’s set up correctly, you’ll get a success message. If it doesn’t work, double-check the URI and credentials—it’s usually one of those two causing issues.

- Test Connection Successful Result
-
Save and Start Replicating
- Once the test passes, save the settings and you’re done! From now on, whenever you publish a page or asset, this agent will handle moving it to the publish instance.
-
To verify
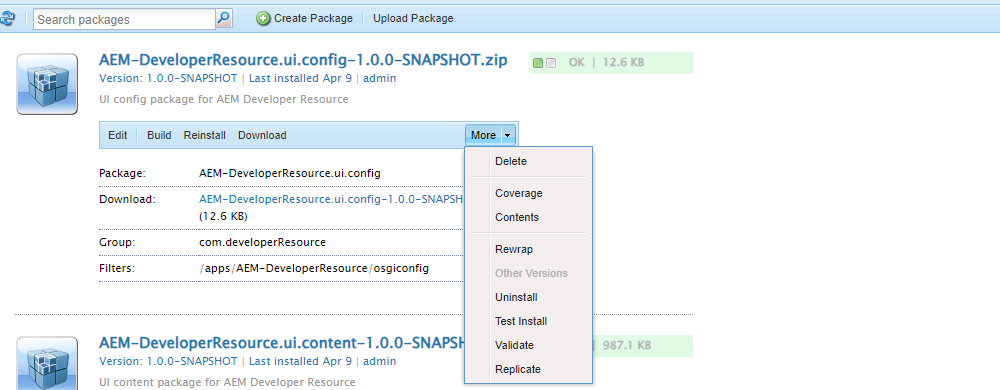
- you can go to the author package manager, select a package, and from the more option replicate the package.
What is Reverse Replication in AEM
-
So, let’s talk about reverse replication. It’s not something you’ll use every day, but when you need it, it’s pretty useful.
-
Okay, here’s the thing. In AEM, we usually move content from the author instance (where you create all your pages and assets) to the publish instance (the live site) using regular replication. But what if you need content to go the other way? That’s where reverse replication comes in.
-
What does it do?
-
Reverse replication takes stuff from the publish instance (your live site) and sends it back to the author instance.
-
-
Why Would You Need This?
-
You don’t always need reverse replication, but it comes in handy if you’re working with a lot of user-generated content. Like, if your site gets a lot of comments, feedback, or form submissions, you’ll want that info to make its way back to the author instance for the team to manage.
-
Just a heads up—reverse replication isn’t supported in AEM Cloud right now. If you’re using AEM Cloud, you’ll probably have to find another way to handle this, like using an API to grab that data. So, keep that in mind if you’re working in the cloud environment.
-
How to Set Up Reverse Replication Agents in AEM
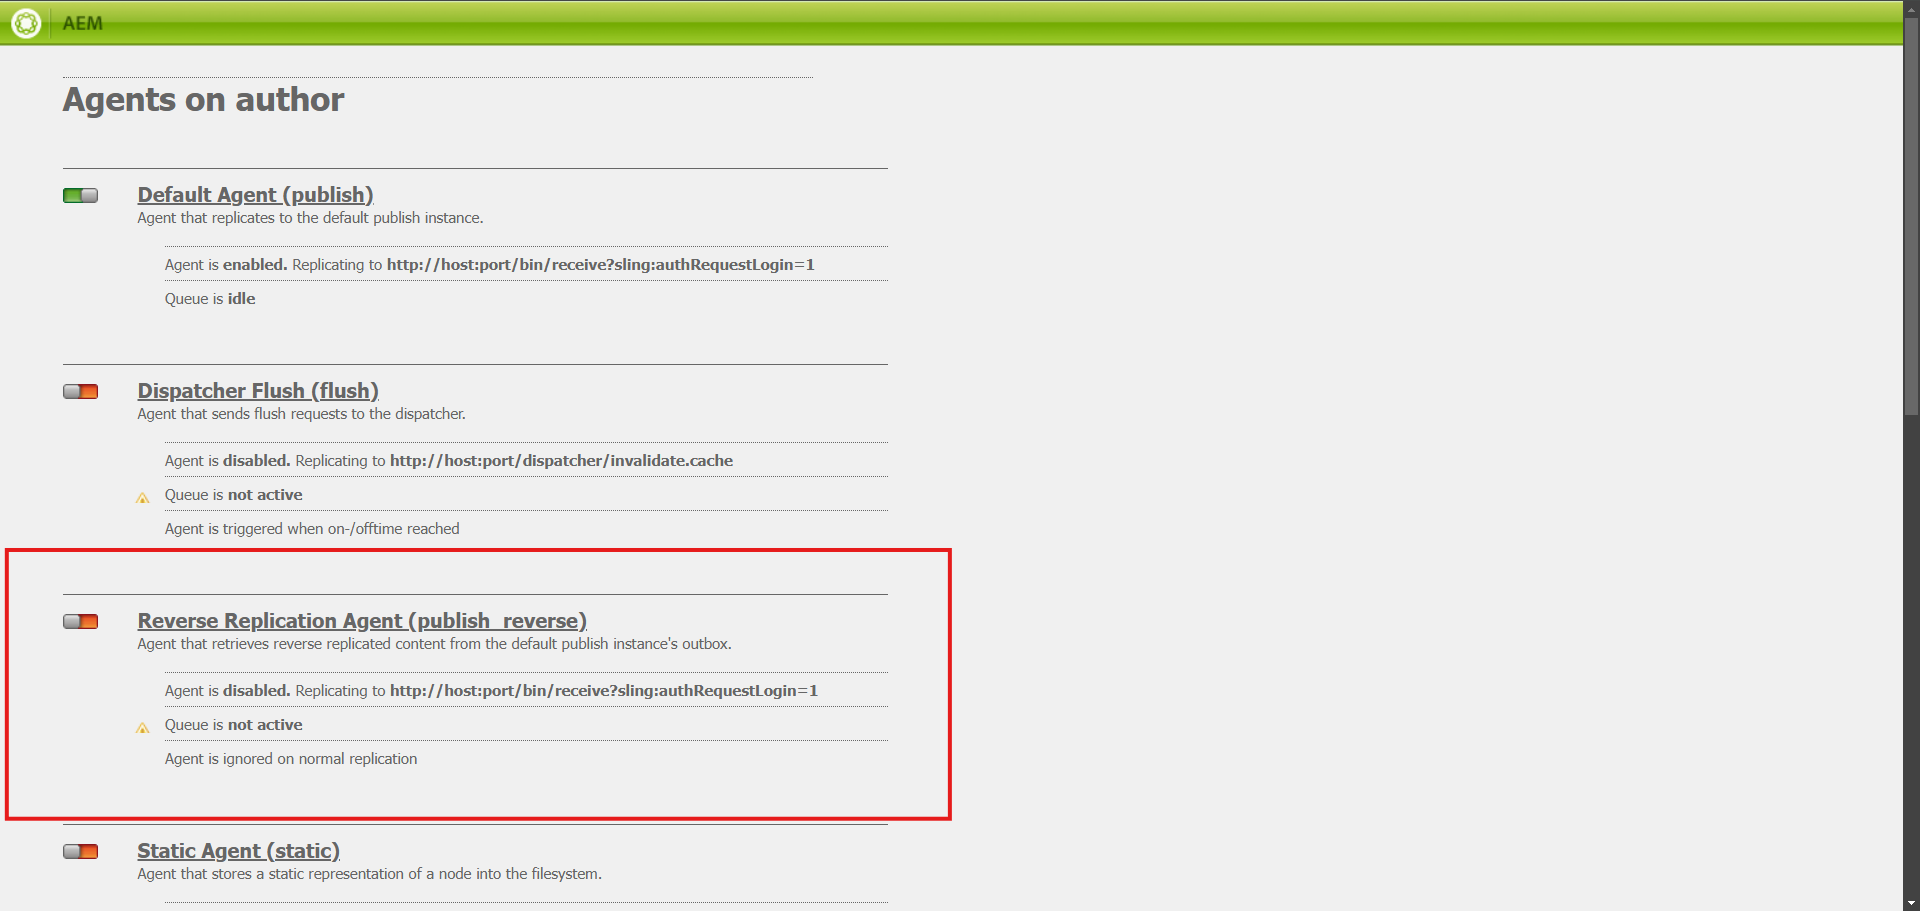
Alright, let’s talk about Reverse replication agents in AEM. If you’ve never set one up before, don’t worry it’s not as intimidating as it sounds. These agents are what make it possible to move your content from the publish instance (where your audience sees it) to the author instance (where you create and manage it). It’s like setting up a delivery route for your content. Here’s how you can do it step by step:
-
Find the Replication Section
- First, log into your AEM author instance. If you’re working locally, this is probably something like http://localhost:4502. Once you’re in, navigate to Tools → Deployment → Replication. This is where all the replication settings live.

-
Now, you’ll see two main options: Agents on Author and Agents on Publish. We’re working with the Agents on the Author section for now.

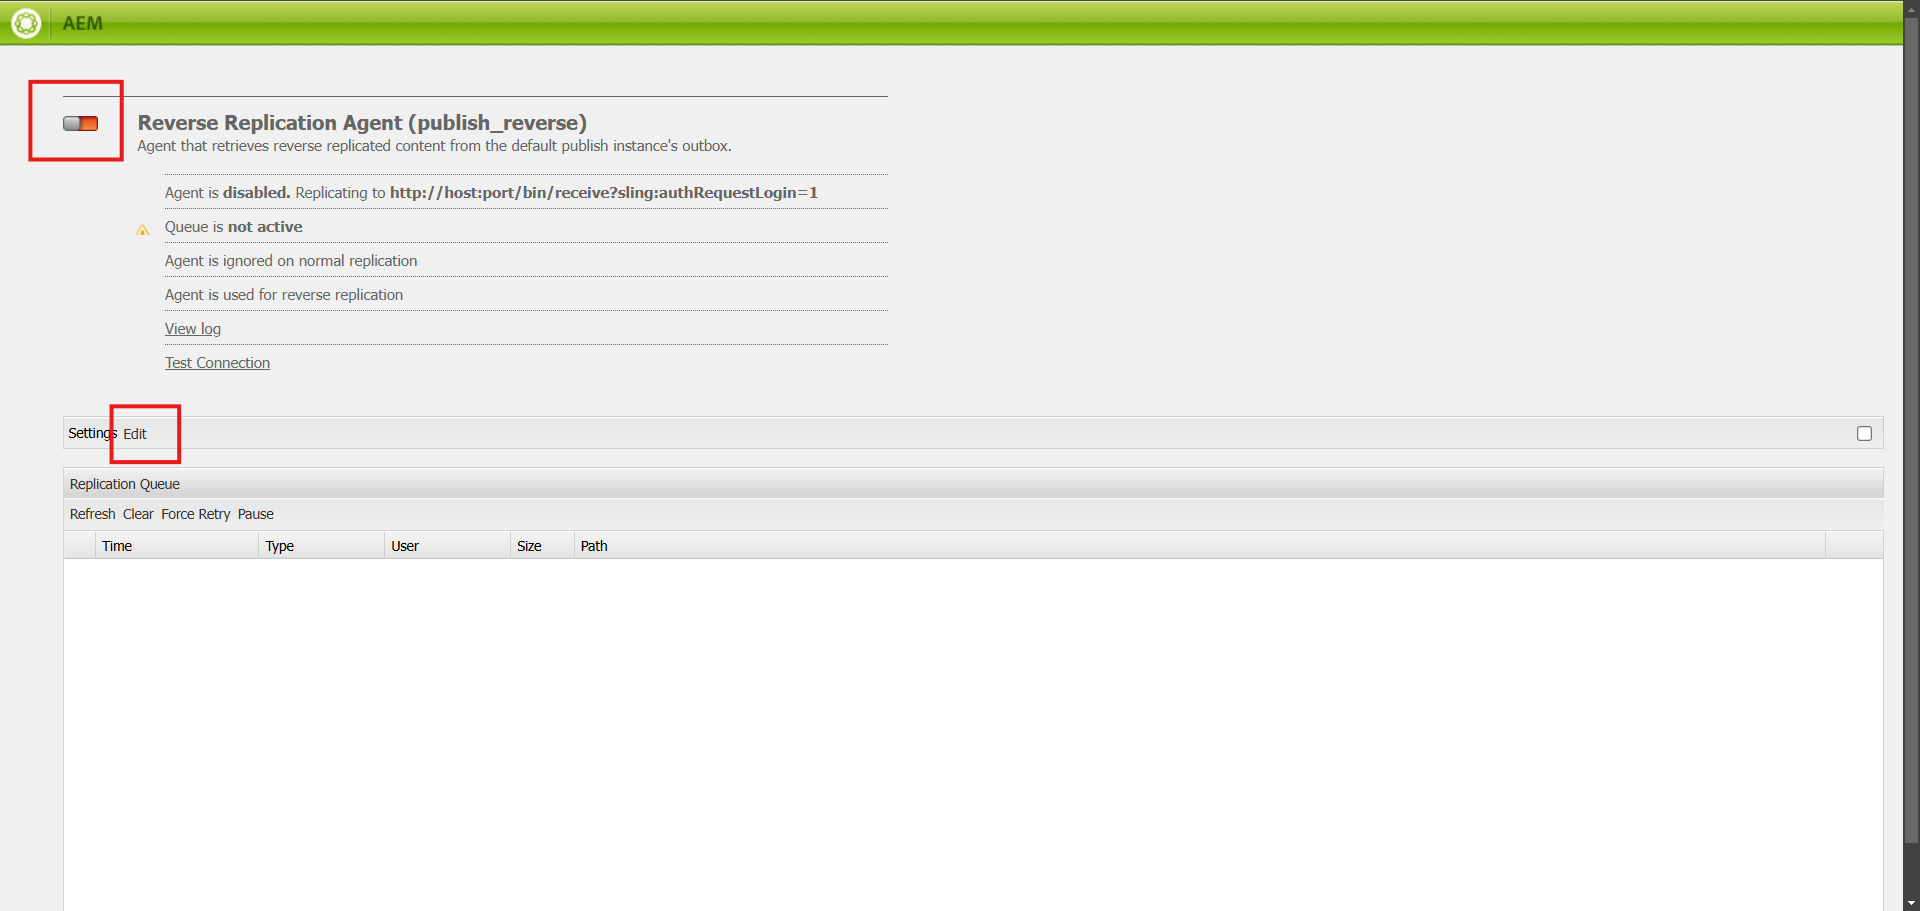
- Add a New Agent
- Here’s where the setup starts. You can either create a brand-new agent or tweak one that already exists:
- If you’re creating a new one, look for a button like Add Agent (or something similar, depending on your AEM version).
- If you’re editing an existing agent, just click its name or the edit icon.
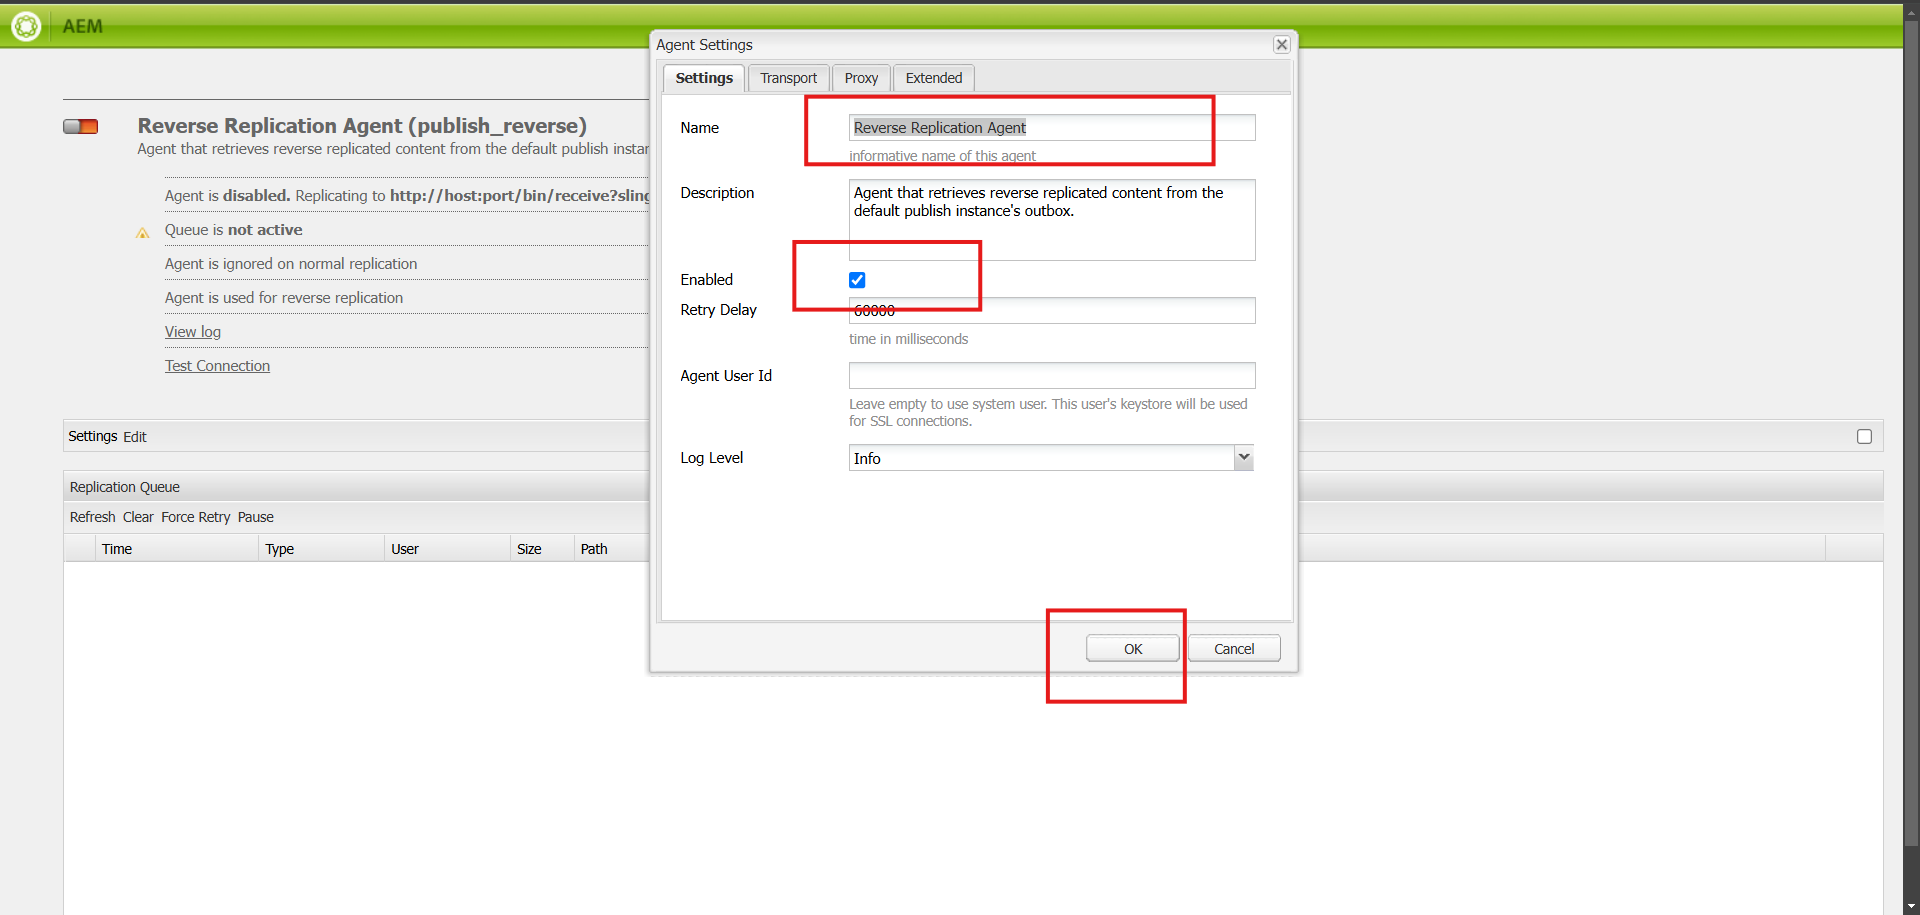
- Fill in the Basic Details
- Once you’re in the agent settings, you’ll need to add some basic info:
- Name: Pick something descriptive, like “Author to Publish Agent.”
- Enabled: Make sure you check this box—this turns the agent “on.”
- Description: Optional, but it’s helpful to note what this agent does, especially if you’re managing a lot of them.
- Agent user ID — Leave this empty
- Configure the Transport Settings
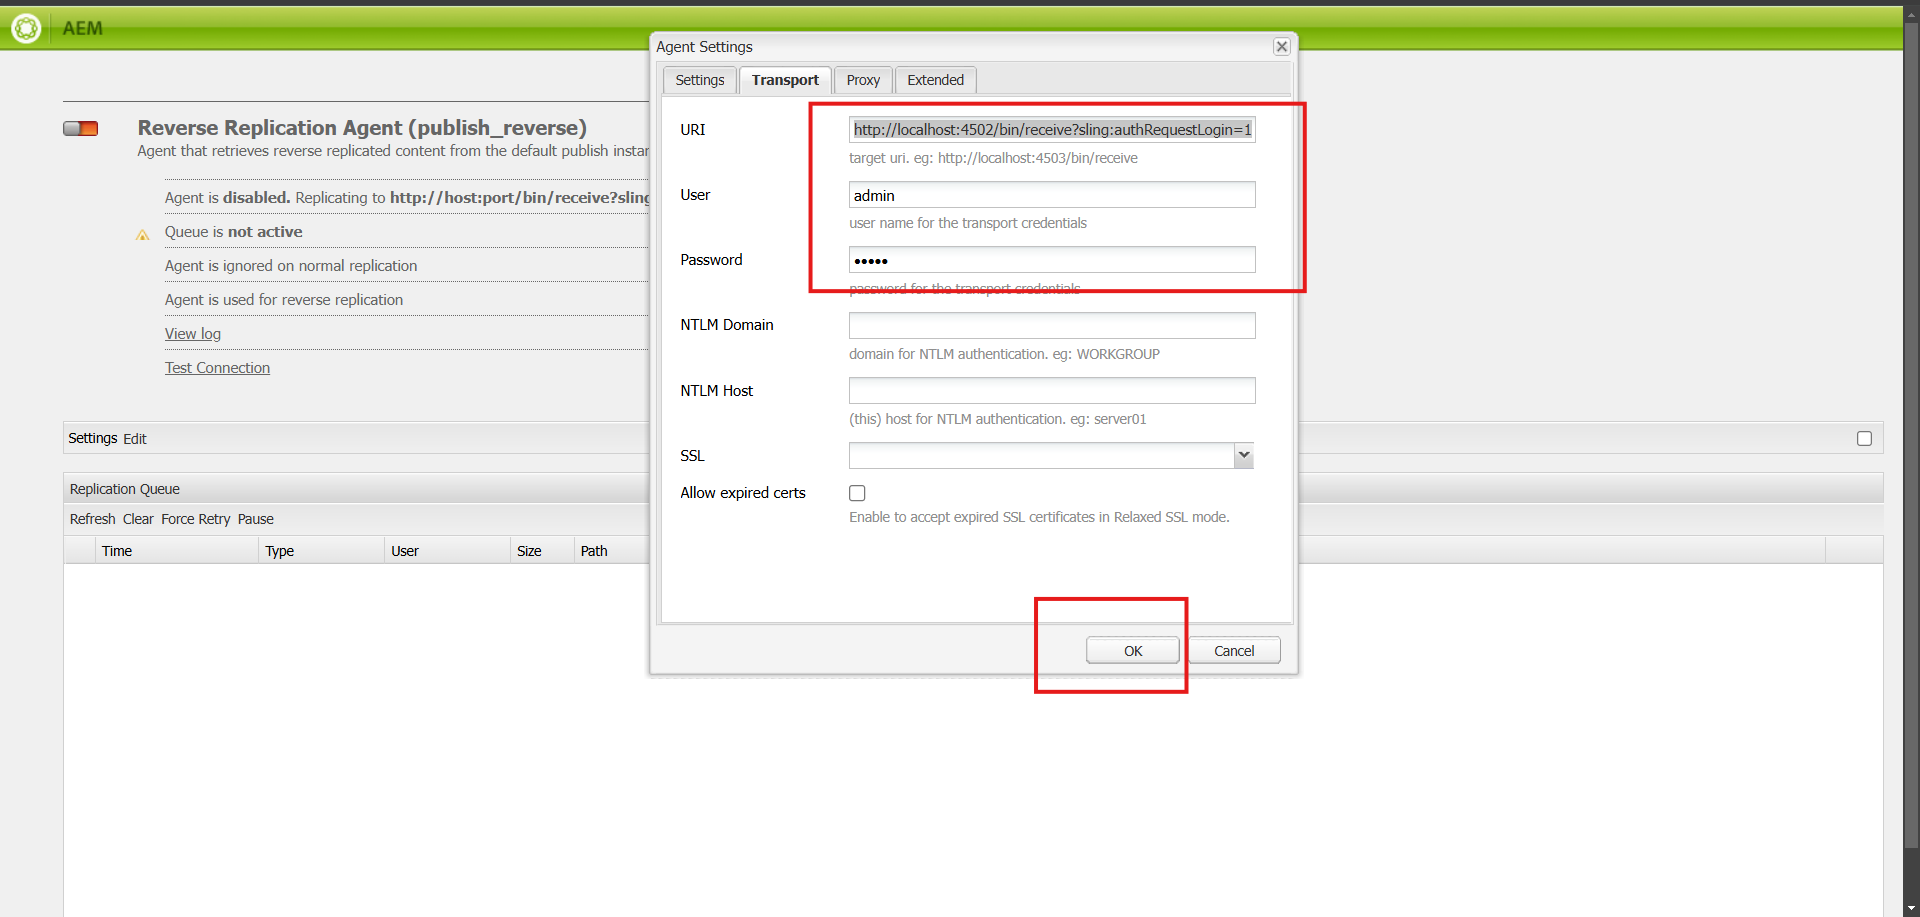
- Now comes the important part—how this agent connects to the author instance. Go to the Transport tab and fill out these details:
- URI: This is the author instance’s address. For local setups, it’s usually something like http://localhost:4503/bin/receive.
- User and Password: Use the credentials for the author instance. If you haven’t changed them, they’re probably admin/admin. (Side note: Change these in production for security!)
Test the Connection
- Before wrapping up, always test the connection. There should be a Test Connection button. Hit it, and if everything’s set up correctly, you’ll get a success message. If it doesn’t work, double-check the URI and credentials—it’s usually one of those two causing issues.

-
Save and Start Replicating
- Once the test passes, save the settings and you’re done! From now on, whenever you publish a page or asset, this agent will handle moving it to the publish instance.
Note Reverse Replication is not available in the AEM cloud version
AEM Replication Workflow
Replication in AEM is just about moving content around. The idea is to get what you’ve created on the author instance to the people who need to see it. Here’s the step-by-step flow—it’s actually simpler than it sounds.
- Publish → Dispatcher
-
Alright, now your content is sitting pretty on the publish instance. But it doesn’t stop there. The next stop is the dispatcher, AEM’s caching system.
-
What does the dispatcher do? It holds onto your published content, like a storage box. Why? Because fetching content from the cache is way faster than going back and get from the publish instance.
-
Here’s an example: imagine hundreds of users are visiting your homepage at the same time. Instead of the publish instance dealing with every request (and instance slowing down), the dispatcher serves cached content.
-
But what happens when you update something? That’s where the dispatcher flush agent kicks in. It clears out the old cached content and replaces it with your shiny, updated version. No outdated stuff hanging around.
-
- Dispatcher → End-User
-
This is the final. After the content gets stored in the dispatcher cache, it’s ready to be shown to end user of your site.
-
For example, if you update a banner on your homepage, the dispatcher will deliver the updated content to end users. It’s quick because the content is already cached, so there’s no delay in loading.
-
Now, if you make another update to that banner, the dispatcher clears the old version from the cache and replaces it with the new one. This way, users always see the latest changes.
-
What Are Replication Queues?
-
Replication queues in AEM are like a to-do list for publishing content. When you publish something from the author instance, it goes into the queue. From there, the system processes each item in order and sends it to the publish instance.
-
How Do They Work?
- Here’s the step by step
- When you hit “publish,” the content goes into the queue.
- The replication agent picks it up and moves it to the publish instance.
- You can check the queue in the AEM Web Console to see what’s happening.
- Here’s the step by step
Replication Using Custom API
-
You can use the com.day.cq.replication API in AEM to replicate content programmatically. Here’s how you can do it:
- Use the Replicator Service
- Use the @Reference annotation to include the Replicator OSGi service in your code
@ReferenceReplicator replicator;
This way, it uses the resolver from the resource context.
- Replicate Content
- Use the replicate() method from the Replicator interface. This method takes three inputs:
- Session: The JCR session.
- Replication Type: For example, “Activate” to publish.
- Path: The path of the resource or content you want to replicate.
replicator.replicate(session, “Activate”, resource_path);
Custom Workflow Process for Replication
-
AEM provides a Replication API that replicates the content from an AEM Author to the AEM Publish instance or any other author instance. Here, we will see how we can replicate content programmatically. We can accomplish this with Sling Servlet or Workflow Process Step.
Here is the Code: CustomerReplicationStep.java
import com.day.cq.replication.*;import com.day.cq.workflow.WorkflowException;import com.day.cq.workflow.WorkflowSession;import com.day.cq.workflow.exec.WorkItem;import com.day.cq.workflow.exec.WorkflowProcess;import com.day.cq.workflow.metadata.MetaDataMap;import org.osgi.framework.Constants;import org.osgi.service.component.annotations.Component;import org.osgi.service.component.annotations.Reference;import org.slf4j.Logger;import org.slf4j.LoggerFactory; import javax.jcr.Session; /** * @author naveen rapelly */ @Component(service = WorkflowProcess.class, property = {Constants.SERVICE_DESCRIPTION + “= Custom Replication Step”, Constants.SERVICE_VENDOR + “= workflow.com”, “process.label” + “= Custom Replication Step”})public class CustomerReplicationStep implements WorkflowProcess { private static final Logger logger = LoggerFactory.getLogger(CustomerReplicationStep.class); @Reference Replicator replicator; @Reference AgentManager agentManager; private static final String AGENT_NAME = “Custom Replication Agent”; private static final String PAYLOAD_PATH = “/content/learning/us/en/samplePage”; @Override public void execute(WorkItem workItem, WorkflowSession workflowSession, MetaDataMap metaDataMap) throws WorkflowException { try { Session session = workflowSession.getSession(); for (Agent agent : agentManager.getAgents().values()) { if (AGENT_NAME.equals(agent.getConfiguration().getName())) { ReplicationOptions options = new ReplicationOptions(); options.setFilter(agentConfig -> AGENT_NAME.equals(agentConfig.getName())); options.setSynchronous(false); replicator.replicate(session, ReplicationActionType.ACTIVATE, PAYLOAD_PATH, options); logger.info(“Replicated via Agent: {} for Payload: {}”, AGENT_NAME, PAYLOAD_PATH); } } } catch (ReplicationException e) { logger.error(“Error during replication: {}”, e.getMessage()); } }}
-
When this workflow step runs:
- It checks the list of replication agents to find the one named Custom Replication Agent.
- It uses the Replicator API to replicate the content defined in the payload (/content/learning/us/en/samplepage).
- A log entry confirms the replication was successful.
Log Output
12.07.2024 09:16:11.067 *INFO* [JobHandler: /var/workflow/instances/server0/2024-07-12/contentmigration:/content/learning/us/en/samplePage]
com.adobe.learning.core.workflow.PackageReplicationStep Replicated via Agent : Custom Replication Agent for Payload /content/learning/us/en/samplePage
Every great discussion starts with a simple thought! If you enjoyed this article, found it useful, or have any questions, let’s talk! I’d love to hear from you.
For more updates, tips, and engaging conversations, connect with me on Medium, LinkedIn, and RealCodeWorks. Let’s keep learning together! 🚀✨
Thank you 🙏 !

